
Flutter State Management: Beyond Packages (Part 3)
We’ll build a complete custom state management solution that’s lightweight, type-safe, and scalable.
A Quick Recap
In the first part of this mini-series on Flutter state management, we covered understanding Flutter’s built-in state management tools using StatefulWidget, setState and InheritedWidget. We also covered Flutter’s observer pattern implementations using ChangeNotifier, ValueNotifier and ValueListenableBuilder.
In the second part we covered reactive programming with streams using StreamBuilder and StreamController, combining and transforming complex streams, and discussed choosing the right solution.
If you’re not familiar with any of these methods of implementing state management, take the time to familiarize yourself by reading these articles first.
Continuing on…
Now, in Part 3, we’ll put it all together by building a complete custom state management solution that’s lightweight, type-safe, and scalable. Our goal is to create a solution that provides the convenience of popular packages while maintaining transparency and control over the implementation.
The Complete Custom Solution
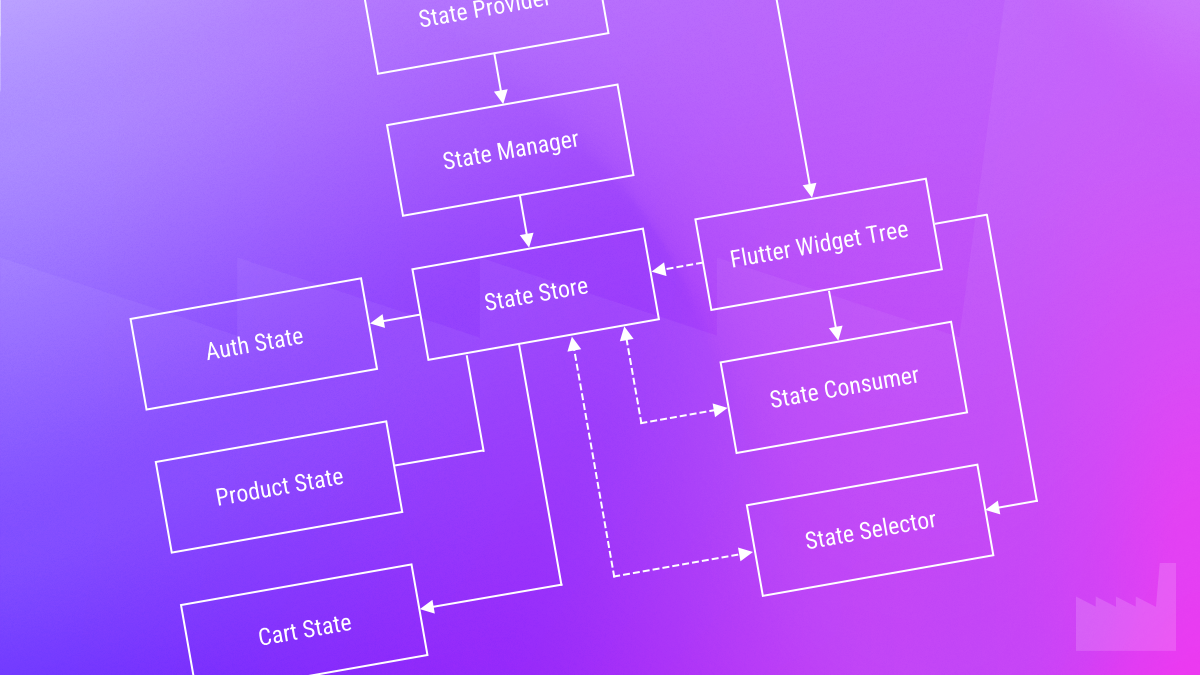
Our state management solution consists of several key components:
StateStore: A generic container for state that notifies listeners when the state changesStateManager: A centralized registry for all state storesStateProvider: Makes state stores available throughout the widget treeStateConsumerandStateSelector: Widgets that rebuild when state changes
Let’s dive into the implementation of each component.
The StateStore Class
At the heart of our solution is the StateStore<T> class, which holds state of any type and provides methods to update it:
import 'dart:async';

/// A generic store for state management.
class StateStore<T> {
  // Current state
  T _state;

  // Stream controller for state updates
  final _stateController = StreamController<T>.broadcast();

  // Constructor
  StateStore(this._state) {
    // Initialize the stream with current state
    _stateController.add(_state);
  }

  // State getters
  T get state => _state;
  Stream<T> get stream => _stateController.stream;

  // Update state
  void update(T newState) {
    _state = newState;
    _stateController.add(_state);
  }

  // Update state with a reducer function
  void updateWith(T Function(T currentState) reducer) {
    final newState = reducer(_state);
    update(newState);
  }

  void dispose() {
    _stateController.close();
  }
}
The StateStore class leverages Dart streams to provide reactivity. When the state changes, all listeners are notified. The updateWith method is particularly useful as it allows for updating state based on the current state, similar to React’s setState updater function.
State Classes
Before we proceed with the rest of our solution, let’s look at a typical state class that would be managed by our StateStore:
class ProductState {
  final List<Product> products;
  final bool isLoading;
  final String? error;
  final String? selectedCategory;

  const ProductState({
    this.products = const [],
    this.isLoading = false,
    this.error,
    this.selectedCategory,
  });

  List<String> get categories {
    final allCategories = <String>{};
    for (final product in products) {
      allCategories.addAll(product.categories);
    }
    return allCategories.toList()..sort();
  }

  List<Product> get filteredProducts {
    if (selectedCategory == null || selectedCategory!.isEmpty) {
      return products;
    }
    return products.where((p) => p.categories.contains(selectedCategory)).toList();
  }

  ProductState copyWith({
    List<Product>? products,
    bool? isLoading,
    String? error,
    String? selectedCategory,
    bool clearError = false,
    bool clearCategory = false,
  }) {
    return ProductState(
      products: products ?? this.products,
      isLoading: isLoading ?? this.isLoading,
      error: clearError ? null : error ?? this.error,
      selectedCategory: clearCategory ? null : selectedCategory ?? this.selectedCategory,
    );
  }
}
Our state classes follow these principles:
— Immutability: State objects are immutable
— Computed properties: Derived state is exposed through getters
— Copy-with pattern: A copyWith method for efficient state updates
StateManager
As applications grow, managing multiple state stores becomes challenging. To solve this, we introduce the StateManager class, which centralizes store registration and access:
import 'package:flutter/widgets.dart';
import 'state_store.dart';

/// A class to hold state store instances by their type
class StateManager {
  final Map<Type, StateStore<dynamic>> _stores = {};

  /// Register a store with a specific type
  void register<T>(StateStore<T> store) {
    _stores[T] = store;
  }

  /// Get a store by type
  StateStore<T> get<T>() {
    final store = _stores[T];
    if (store == null) {
      throw FlutterError(
        'No StateStore<$T> was found in the StateManager. '
        'Make sure to register it before accessing.',
      );
    }
    return store as StateStore<T>;
  }

  /// Dispose all registered stores
  void dispose() {
    for (final store in _stores.values) {
      store.dispose();
    }
    _stores.clear();
  }
}
The StateManager maps state types to their respective state stores. This approach allows us to retrieve stores by their state type, which is both type-safe and convenient.
StateProvider
To make our state stores available throughout the widget tree, we implement a StateProvider using an InheritedWidget:
import 'package:flutter/widgets.dart';
import 'state_manager.dart';
import 'state_store.dart';

/// A widget that provides multiple state stores to the widget tree
class StateProvider extends StatefulWidget {
  final StateManager stateManager;
  final Widget child;

  const StateProvider({
    Key? key,
    required this.stateManager,
    required this.child,
  }) : super(key: key);

  @override
  State<StateProvider> createState() => _StateProviderState();

  /// Get a state store from the context
  static StateStore<T> of<T>(BuildContext context) {
    final provider = context.dependOnInheritedWidgetOfExactType<_InheritedState>();
    if (provider == null) {
      throw FlutterError('No StateProvider found in context');
    }
    return provider.stateManager.get<T>();
  }
}

class _StateProviderState extends State<StateProvider> {
  @override
  void dispose() {
    widget.stateManager.dispose();
    super.dispose();
  }

  @override
  Widget build(BuildContext context) {
    return _InheritedState(
      stateManager: widget.stateManager,
      child: widget.child,
    );
  }
}

/// InheritedWidget that holds the state manager
class _InheritedState extends InheritedWidget {
  final StateManager stateManager;

  const _InheritedState({
    Key? key,
    required this.stateManager,
    required Widget child,
  }) : super(key: key, child: child);

  @override
  bool updateShouldNotify(_InheritedState old) {
    return stateManager != old.stateManager;
  }
}
The StateProvider serves as a single entry point for accessing all state stores in the application. Note how the of<T>() static method uses generics to provide type-safe access to the appropriate store.
StateConsumer and StateSelector
To connect our UI to the state, we create two specialized widgets. The first is a StateConsumer, the implementation of which is below:
import 'package:flutter/widgets.dart';
import 'store_provider.dart';

/// Consumer widget that rebuilds when a specific state store changes
class StateConsumer<T> extends StatelessWidget {
  final Widget Function(BuildContext context, T state) builder;

  const StateConsumer({
    Key? key,
    required this.builder,
  }) : super(key: key);

  @override
  Widget build(BuildContext context) {
    final store = StateProvider.of<T>(context);

    return StreamBuilder<T>(
      stream: store.stream,
      initialData: store.state,
      builder: (context, snapshot) {
        final data = snapshot.data;
        if (data == null) {
          return Center(child: CircularProgressIndicator());
        }
        return builder(context, data);
      },
    );
  }
}
The second is more specialized in that it only triggers a rebuild when a specific part changes. We call this widget the StateSelector:
/// Selector that rebuilds only when selected value from a specific state store changes
class StateSelector<T, R> extends StatefulWidget {
  final R Function(T state) selector;
  final Widget Function(BuildContext context, R selectedValue) builder;

  const StateSelector({super.key, required this.selector, required this.builder});

  @override
  State<StateSelector<T, R>> createState() => _StateSelectorState<T, R>();
}

class _StateSelectorState<T, R> extends State<StateSelector<T, R>> {
  late R _selectedValue;
  Widget? _lastBuiltWidget;
  bool _didUpdateDependencies = false;

  @override
  void didChangeDependencies() {
    super.didChangeDependencies();
    if (!_didUpdateDependencies) {
      final store = StateProvider.of<T>(context);
      _selectedValue = widget.selector(store.state);
      _didUpdateDependencies = true;
    }
  }

  @override
  Widget build(BuildContext context) {
    final store = StateProvider.of<T>(context);

    return StreamBuilder<T>(
      stream: store.stream,
      initialData: store.state,
      builder: (context, snapshot) {
        final data = snapshot.data;
        if (data == null) {
          return Center(child: CircularProgressIndicator());
        }

        // Extract the value using the selector
        final newSelectedValue = widget.selector(data);

        // Only rebuild if the selected value has changed
        if (_lastBuiltWidget == null || !_areEqual(newSelectedValue, _selectedValue)) {
          debugPrint('Rebuilding ${widget.runtimeType} because selected value changed');
          _selectedValue = newSelectedValue;
          _lastBuiltWidget = widget.builder(context, _selectedValue);
        } else {
          debugPrint('Skipping rebuild of ${widget.runtimeType} - selected value unchanged');
        }

        return _lastBuiltWidget!;
      },
    );
  }

  // Custom equality check that handles various types
  bool _areEqual(R a, R b) {
    if (a == b) return true;

    // Handle lists (deep comparison)
    if (a is List && b is List) {
      if (a.length != b.length) return false;
      for (int i = 0; i < a.length; i++) {
        if (a[i] != b[i]) return false;
      }
      return true;
    }

    // Handle maps (deep comparison)
    if (a is Map && b is Map) {
      if (a.length != b.length) return false;
      for (final key in a.keys) {
        if (!b.containsKey(key) || a[key] != b[key]) return false;
      }
      return true;
    }

    return false;
  }
}
The StateSelector has the following powerful features:
- True Selective Rebuilding: The
StateSelectoronly rebuilds when the selected portion of the state actually changes, not when the entire state object changes. - Widget Caching: By caching the built widget, we avoid unnecessary rebuilding work even when the
StreamBuilderitself rebuilds. - Deep Equality Checking: Our custom equality checking handles complex data structures like lists and maps, making the selector work reliably with all types of state.
- Better Memory Efficiency: By minimizing rebuilds, we reduce the CPU and memory overhead of our application.
This kind of optimization is exactly what makes custom state management solutions powerful. You have full control over how and when widgets rebuild, allowing you to fine-tune performance in ways that might not be possible with some packages.
The StateSelector is particularly valuable for:
- Widgets that depend on a small part of a larger state object
- Lists or grids where each item only cares about its own data
- Complex UIs where rebuilding the entire screen would be expensive
- Components that need to react to specific state changes (like a badge showing cart count)
In summary:
StateConsumerrebuilds whenever the entire state changesStateSelectoruses a selector function to extract specific parts of the state and only rebuilds when that selection changes
These consumer widgets wrap Flutter’s StreamBuilder to provide a more convenient API for our state management pattern.
Putting It All Together
Now let’s see how all these components work together in a complete application. We’ll create a small e-commerce app with product listing, filtering, and shopping cart functionality.
Setting Up Stores
First, we initialize our stores and register them with the StateManager:
// In our app.dart file
import 'package:flutter/material.dart';
import 'state/store_manager.dart';
import 'state/states/auth_state.dart';
import 'state/states/cart_state.dart';
import 'state/states/product_state.dart';
import 'state/state_provider.dart';
import 'state/state_store.dart';

class ShopApp extends StatelessWidget {
  // Create a state manager and register all state stores
  final stateManager = StateManager()
    ..register<AuthState>(StateStore<AuthState>(AuthState()))
    ..register<ProductState>(StateStore<ProductState>(ProductState()))
    ..register<CartState>(StateStore<CartState>(CartState()));

  ShopApp({super.key});

  @override
  Widget build(BuildContext context) {
    // Use a single provider for all state stores
    return StateProvider(
      stateManager: stateManager,
      child: MaterialApp(
        title: 'Shop App',
        theme: ThemeData(
          primarySwatch: Colors.blue,
          visualDensity: VisualDensity.adaptivePlatformDensity,
        ),
        home: HomeScreen(),
        debugShowCheckedModeBanner: false,
      ),
    );
  }
}
Accessing State
Let’s look at our HomeScreen implementation to see how we access and update state:
class HomeScreen extends StatefulWidget {
  const HomeScreen({super.key});

  @override
  State<HomeScreen> createState() => _HomeScreenState();
}

class _HomeScreenState extends State<HomeScreen> {
  final ApiService _apiService = ApiService();
  late StateStore<ProductState> _productStore;
  bool _isInitialized = false;

  @override
  void didChangeDependencies() {
    super.didChangeDependencies();

    // Only initialize once
    if (!_isInitialized) {
      _productStore = StateProvider.of<ProductState>(context);
      _loadProducts();
      _isInitialized = true;
    }
  }

  Future<void> _loadProducts() async {
    // Set loading state
    _productStore.updateWith((state) => state.copyWith(isLoading: true, clearError: true));

    try {
      final products = await _apiService.getProducts();

      // Check if the widget is still mounted before updating state
      if (!mounted) return;

      _productStore.updateWith((state) => state.copyWith(products: products, isLoading: false));
    } catch (e) {
      // Check if the widget is still mounted before updating state
      if (!mounted) return;

      _productStore.updateWith((state) => state.copyWith(isLoading: false, error: e.toString()));
    }
  }

  @override
  Widget build(BuildContext context) {
    return Scaffold(
      appBar: AppBar(
        title: Text('Shop App'),
        actions: [_buildCartButton()],
      ),
      body: RefreshIndicator(
        onRefresh: _loadProducts,
        child: Column(
          children: [
            _buildCategoriesFilter(),
            Expanded(child: _buildProductGrid()),
          ],
        ),
      ),
    );
  }

  // Other methods...
}
Note how we access the product store using StateProvider.of<ProductState>(context) and update it with _productStore.updateWith(). The updateWith method accepts a reducer function that receives the current state and returns the new state.
Rendering State with StateConsumer
Now let’s see how StateConsumer is used to render the product grid:
Widget _buildProductGrid() {
  return StateConsumer<ProductState>(
    builder: (context, state) {
      if (state.isLoading) {
        return Center(child: CircularProgressIndicator());
      }

      if (state.error != null) {
        return Center(
          child: Column(
            mainAxisAlignment: MainAxisAlignment.center,
            children: [
              Text('Error: ${state.error}'),
              SizedBox(height: 16),
              ElevatedButton(
                onPressed: _loadProducts,
                child: Text('Retry'),
              ),
            ],
          ),
        );
      }

      final products = state.filteredProducts;

      if (products.isEmpty) {
        return Center(child: Text('No products found'));
      }

      return GridView.builder(
        padding: EdgeInsets.all(16),
        gridDelegate: SliverGridDelegateWithFixedCrossAxisCount(
          crossAxisCount: 2,
          childAspectRatio: 0.7,
          crossAxisSpacing: 10,
          mainAxisSpacing: 10,
        ),
        itemCount: products.length,
        itemBuilder: (ctx, i) => ProductCard(
          product: products[i],
          onTap: () => _navigateToProductDetail(products[i]),
        ),
      );
    },
  );
}
The StateConsumer rebuilds whenever the ProductState changes, allowing us to show loading indicators, error messages, or the product grid based on the current state.
Optimizing Rebuilds with StateSelector
For more fine-grained control over rebuilds, we use StateSelector. Here’s how we use it for the cart button in the app bar:
Widget _buildCartButton() {
  return StateSelector<CartState, int>(
    selector: (state) => state.itemCount,
    builder: (context, itemCount) {
      return Stack(
        alignment: Alignment.center,
        children: [
          IconButton(
            icon: Icon(Icons.shopping_cart),
            onPressed: () {
              Navigator.of(context).push(
                MaterialPageRoute(builder: (_) => CartScreen()),
              );
            },
          ),
          if (itemCount > 0)
            Positioned(
              top: 8,
              right: 8,
              child: Container(
                padding: EdgeInsets.all(2),
                decoration: BoxDecoration(
                  color: Colors.red,
                  borderRadius: BorderRadius.circular(10),
                ),
                constraints: BoxConstraints(
                  minWidth: 16,
                  minHeight: 16,
                ),
                child: Text(
                  '$itemCount',
                  style: TextStyle(
                    color: Colors.white,
                    fontSize: 10,
                  ),
                  textAlign: TextAlign.center,
                ),
              ),
            ),
        ],
      );
    },
  );
}
The StateSelector only rebuilds when the itemCount changes, not when any other part of the cart state changes. This is more efficient than using StateConsumer for the entire cart state.
Adding Items to Cart
Let’s see how we update state when adding items to the cart:
// From our ProductCard widget
void _addToCart(StateStore<CartState> cartStore) {
  cartStore.updateWith((state) {
    final currentItems = List<CartItem>.from(state.items);
    final index = currentItems.indexWhere((item) => item.product.id == product.id);

    if (index >= 0) {
      // Update existing item
      currentItems[index] = currentItems[index].copyWith(
        quantity: currentItems[index].quantity + 1,
      );
    } else {
      // Add new item
      currentItems.add(CartItem(product: product));
    }

    return state.copyWith(items: currentItems);
  });
}
We use the updateWith method to update the cart state based on its current value. This ensures our state updates are safe and predictable.
Advanced Patterns and Techniques
Let’s explore some advanced patterns and techniques that can enhance our custom state management solution.
Middleware for Side Effects
For handling side effects like API calls, we can implement a simple middleware pattern:
typedef Middleware<T> = Future<void> Function(
  StateStore<T> store,
  T state,
  void Function() next,
);

class StateStoreWithMiddleware<T> extends StateStore<T> {
  final List<Middleware<T>> _middleware;

  StateStoreWithMiddleware(T initialState, this._middleware) : super(initialState);

  @override
  void update(T newState) {
    _runMiddleware(0, newState, () {
      super.update(newState);
    });
  }

  void _runMiddleware(int index, T newState, void Function() next) {
    if (index >= _middleware.length) {
      next();
      return;
    }

    _middleware[index](this, newState, () {
      _runMiddleware(index + 1, newState, next);
    });
  }
}
This allows us to intercept state updates and perform side effects:
// Logging middleware
final loggingMiddleware = <T>(StateStore<T> store, T state, void Function() next) async {
  print('Updating state: $state');
  next();
  print('State updated: ${store.state}');
};

// API middleware
final apiMiddleware = (StateStore<ProductState> store, ProductState state, void Function() next) async {
  next(); // Update the state first

  if (state.shouldRefreshProducts) {
    try {
      final products = await apiService.getProducts();
      store.updateWith((s) => s.copyWith(
        products: products,
        shouldRefreshProducts: false,
      ));
    } catch (e) {
      store.updateWith((s) => s.copyWith(
        error: e.toString(),
        shouldRefreshProducts: false,
      ));
    }
  }
};

// Usage
final productStore = StateStoreWithMiddleware<ProductState>(
  ProductState(),
  [loggingMiddleware, apiMiddleware],
);
Persistent State
For persisting state across app restarts, we can extend our StateStore class:
class PersistentStateStore<T> extends StateStore<T> {
  final String key;
  final Future<void> Function(String key, T state) saveState;
  final Future<T?> Function(String key) loadState;

  PersistentStateStore({
    required T initialState,
    required this.key,
    required this.saveState,
    required this.loadState,
  }) : super(initialState) {
    _init();
  }

  Future<void> _init() async {
    final savedState = await loadState(key);
    if (savedState != null) {
      update(savedState);
    }
  }

  @override
  void update(T newState) {
    super.update(newState);
    saveState(key, newState);
  }
}

// Usage with shared_preferences
final cartStore = PersistentStateStore<CartState>(
  initialState: CartState(),
  key: 'cart',
  saveState: (key, state) async {
    final prefs = await SharedPreferences.getInstance();
    final json = jsonEncode(state.toJson());
    await prefs.setString(key, json);
  },
  loadState: (key) async {
    final prefs = await SharedPreferences.getInstance();
    final json = prefs.getString(key);
    if (json == null) return null;
    return CartState.fromJson(jsonDecode(json));
  },
);
Computed Selectors with Memoization
For complex derived state, we can implement memoized selectors:
class MemoizedStateSelector<T, R> {
  final R Function(T state) _selector;
  T? _lastState;
  R? _lastResult;

  MemoizedStateSelector(this._selector);

  R select(T state) {
    if (_lastState != state) {
      _lastResult = _selector(state);
      _lastState = state;
    }
    return _lastResult as R;
  }
}

// Usage
final getTotalPriceSelector = MemoizedStateSelector<CartState, double>(
  (state) => state.items.fold(
    0, (sum, item) => sum + item.product.price * item.quantity
  ),
);

// In widget
StateSelector<CartState, double>(
  selector: (state) => getTotalPriceSelector.select(state),
  builder: (context, total) => Text('\$${total.toStringAsFixed(2)}'),
)
Comparing with Third-Party Solutions
Now that we’ve built our custom solution, let’s compare it with popular third-party packages:
Custom Solution vs. Provider
— Similarities: Both use InheritedWidget under the hood, support type-safe access to state
— Differences: Our solution uses streams for reactivity instead of ChangeNotifier
— Pros of Custom: Full control over implementation, no external dependencies
— Cons of Custom: Less community support, might miss optimizations present in Provider
Custom Solution vs. Riverpod
— Similarities: Both offer fine-grained reactivity and state selection
— Differences: Riverpod doesn’t require BuildContext, has more advanced providers
— Pros of Custom: Simpler API, easier to understand implementation
— Cons of Custom: Lacks advanced features like provider overrides and auto-disposal
Custom Solution vs. BLoC
— Similarities: Both use streams for reactivity
— Differences: BLoC strictly separates events from state, has more formal structure
— Pros of Custom: Less boilerplate, more straightforward implementation
— Cons of Custom: Less formal separation of concerns, lacks testing utilities
Custom Solution vs. GetX
— Similarities: Both aim to simplify state management and reduce boilerplate
— Differences: GetX combines state management with routing, DI, and other features
— Pros of Custom: Better separation of concerns, more transparent implementation
— Cons of Custom: Requires more manual implementation of features GetX provides out-of-box
When to Use Each Approach
Use a Custom Solution When:
- You want to understand state management fundamentals
- You need a lightweight solution with minimal dependencies
- Your app has straightforward state requirements
- You value transparent implementation over advanced features
Use Third-Party Packages When:
- You need more advanced features (time-travel debugging, state persistence)
- You want community support and established patterns
- You’re working with a larger team that needs standardization
- Performance optimizations are critical
Try the Example Project

We’ve implemented our custom state management solution in a fully functional Flutter e-commerce application. This practical example demonstrates all the concepts discussed in this article series, from the core StateStore class to optimized UI rebuilds with selectors.
The project includes:
- Complete implementation of the custom state management system
- A multi-screen e-commerce application with product listing and cart functionality
- Examples of different state update patterns
- Integration with ShadCN UI for a polished user interface
You can explore, run, and modify the project by cloning the repository:
git clone https://github.com/dartfoundry/state-management-exampleThis repository serves as both a reference implementation and a starting point for your own projects. By examining the code, you’ll gain deeper insights into how our custom state management approach works in a real-world application context.
Conclusion
Building a custom state management solution in Flutter is not only achievable but can also be a valuable learning experience. Our solution leverages Flutter’s built-in capabilities to create a lightweight, type-safe, and reactive state management system.
Flutter’s flexibility allows for many approaches to state management, and there’s no one-size-fits-all solution. By understanding the core principles of state management — such as the store pattern, reactivity through streams, and efficient UI updates — you gain insights that apply regardless of which state management solution you ultimately choose.
The built-in state management tools we’ve explored are powerful enough for many applications, and they provide a solid foundation even if you eventually adopt a state management package. In fact, most packages are just convenient wrappers around these core concepts.
Remember that the goal of state management is not to use the most sophisticated solution, but to create a predictable, maintainable flow of data through your application. Whether you build your own solution or adopt a third-party package, these principles remain the same.
This has been Part 3 of our “Flutter State Management: Beyond Packages” series. Don’t forget to check out Part 1 for an introduction to Flutter’s built-in state management and Part 2 for reactive programming with streams. In Part 4 we’ll explore testing our state management components to ensure they work reliably and efficiently by writing unit and integration tests.