
Flutter State Management: Beyond Packages (Part 2)
We’ll be covering reactive programming with streams using StreamBuilder and StreamController, combining and transforming complex streams.
A Quick Recap
In the first part of this mini-series on Flutter state management, we covered understanding Flutter’s built-in state management tools using StatefulWidget, setState and InheritedWidget. We also covered Flutter’s observer pattern implementations using ChangeNotifier, ValueNotifier and ValueListenableBuilder. If you’re not familiar with these methods of implementing state management, take the time to familiarize yourself by reading this article.
In this part we’ll be covering reactive programming with streams using StreamBuilder and StreamController, combining and transforming complex streams. We’ll end this part by discussing choosing the right solution.
Reactive Programming with Streams
Dart’s asynchronous programming capabilities provide a powerful foundation for reactive state management through streams. A stream is a sequence of asynchronous events that can be manipulated, transformed, and consumed by interested parties.
StreamBuilder and StreamController
Creating a Stream-based State Container
Let’s build a simple counter model using streams:
class CounterBloc {
  // StreamController manages the stream and sink
  final _counterController = StreamController<int>.broadcast();

  // Current state
  int _counter = 0;

  // Stream getter (output)
  Stream<int> get counterStream => _counterController.stream;

  // Methods to update state
  void increment() {
    _counter++;
    _counterController.add(_counter);
  }

  void decrement() {
    _counter--;
    _counterController.add(_counter);
  }

  void reset() {
    _counter = 0;
    _counterController.add(_counter);
  }

  // Important: Always close controllers when done
  void dispose() {
    _counterController.close();
  }
}
Building Reactive UIs with StreamBuilder
The StreamBuilder widget listens to a stream and rebuilds whenever a new event is emitted:
class CounterScreen extends StatefulWidget {
  @override
  _CounterScreenState createState() => _CounterScreenState();
}

class _CounterScreenState extends State<CounterScreen> {
  final CounterBloc _bloc = CounterBloc();

  @override
  void dispose() {
    _bloc.dispose(); // Prevent memory leaks
    super.dispose();
  }

  @override
  Widget build(BuildContext context) {
    return Scaffold(
      appBar: AppBar(title: Text('Stream Counter')),
      body: Center(
        child: StreamBuilder<int>(
          stream: _bloc.counterStream,
          initialData: 0, // Initial state before any events
          builder: (context, snapshot) {
            if (snapshot.hasError) {
              return Text('Error: ${snapshot.error}');
            }

            return Column(
              mainAxisAlignment: MainAxisAlignment.center,
              children: [
                Text(
                  'Count: ${snapshot.data}',
                  style: TextStyle(fontSize: 24),
                ),
                SizedBox(height: 16),
                Row(
                  mainAxisAlignment: MainAxisAlignment.center,
                  children: [
                    ElevatedButton(
                      onPressed: _bloc.decrement,
                      child: Text('-'),
                    ),
                    SizedBox(width: 16),
                    ElevatedButton(
                      onPressed: _bloc.reset,
                      child: Text('Reset'),
                    ),
                    SizedBox(width: 16),
                    ElevatedButton(
                      onPressed: _bloc.increment,
                      child: Text('+'),
                    ),
                  ],
                ),
              ],
            );
          },
        ),
      ),
    );
  }
}
Implementing a BLoC-like Pattern
The Business Logic Component (BLoC) pattern separates business logic from UI. Here’s a more comprehensive example with a to-do list:
// Data model
class Todo {
  final String id;
  final String title;
  bool completed;

  Todo({
    required this.id,
    required this.title,
    this.completed = false,
  });
}

// BLoC for todos
class TodoBloc {
  // Stream for list of todos
  final _todosController = StreamController<List<Todo>>.broadcast();
  List<Todo> _todos = [];

  // Stream for filtered todos
  final _filterController = StreamController<String>.broadcast();
  String _currentFilter = 'all'; // 'all', 'active', 'completed'

  // Output streams
  Stream<List<Todo>> get todos => _todosController.stream;
  Stream<String> get currentFilter => _filterController.stream;

  // Combined stream for UI that depends on both todos and filter
  Stream<List<Todo>> get filteredTodos =>
    Rx.combineLatest2<List<Todo>, String, List<Todo>>(
      todos,
      currentFilter,
      (todos, filter) {
        switch (filter) {
          case 'active':
            return todos.where((todo) => !todo.completed).toList();
          case 'completed':
            return todos.where((todo) => todo.completed).toList();
          case 'all':
          default:
            return todos;
        }
      }
    );

  TodoBloc() {
    // Initialize streams with current values
    _todosController.add(_todos);
    _filterController.add(_currentFilter);
  }

  // Action methods
  void addTodo(String title) {
    final newTodo = Todo(
      id: DateTime.now().millisecondsSinceEpoch.toString(),
      title: title,
    );
    _todos.add(newTodo);
    _todosController.add(_todos);
  }

  void toggleTodo(String id) {
    final index = _todos.indexWhere((todo) => todo.id == id);
    if (index >= 0) {
      _todos[index].completed = !_todos[index].completed;
      _todosController.add(_todos);
    }
  }

  void removeTodo(String id) {
    _todos.removeWhere((todo) => todo.id == id);
    _todosController.add(_todos);
  }

  void changeFilter(String filter) {
    _currentFilter = filter;
    _filterController.add(_currentFilter);
  }

  void dispose() {
    _todosController.close();
    _filterController.close();
  }
}
The UI for our Todo app:
class TodoApp extends StatefulWidget {
  @override
  _TodoAppState createState() => _TodoAppState();
}

class _TodoAppState extends State<TodoApp> {
  final TodoBloc _bloc = TodoBloc();
  final TextEditingController _textController = TextEditingController();

  @override
  void dispose() {
    _bloc.dispose();
    _textController.dispose();
    super.dispose();
  }

  @override
  Widget build(BuildContext context) {
    return Scaffold(
      appBar: AppBar(title: Text('Stream Todo')),
      body: Column(
        children: [
          // Todo input
          Padding(
            padding: EdgeInsets.all(16),
            child: Row(
              children: [
                Expanded(
                  child: TextField(
                    controller: _textController,
                    decoration: InputDecoration(
                      hintText: 'Add a new todo',
                    ),
                  ),
                ),
                IconButton(
                  icon: Icon(Icons.add),
                  onPressed: () {
                    if (_textController.text.isNotEmpty) {
                      _bloc.addTodo(_textController.text);
                      _textController.clear();
                    }
                  },
                ),
              ],
            ),
          ),

          // Filter buttons
          StreamBuilder<String>(
            stream: _bloc.currentFilter,
            initialData: 'all',
            builder: (context, snapshot) {
              final currentFilter = snapshot.data!;
              return Row(
                mainAxisAlignment: MainAxisAlignment.center,
                children: [
                  FilterButton(
                    title: 'All',
                    selected: currentFilter == 'all',
                    onPressed: () => _bloc.changeFilter('all'),
                  ),
                  FilterButton(
                    title: 'Active',
                    selected: currentFilter == 'active',
                    onPressed: () => _bloc.changeFilter('active'),
                  ),
                  FilterButton(
                    title: 'Completed',
                    selected: currentFilter == 'completed',
                    onPressed: () => _bloc.changeFilter('completed'),
                  ),
                ],
              );
            },
          ),

          // Todo list
          Expanded(
            child: StreamBuilder<List<Todo>>(
              stream: _bloc.filteredTodos,
              initialData: [],
              builder: (context, snapshot) {
                if (snapshot.hasError) {
                  return Center(child: Text('Error: ${snapshot.error}'));
                }

                final todos = snapshot.data!;

                if (todos.isEmpty) {
                  return Center(child: Text('No todos yet!'));
                }

                return ListView.builder(
                  itemCount: todos.length,
                  itemBuilder: (context, index) {
                    final todo = todos[index];
                    return ListTile(
                      leading: Checkbox(
                        value: todo.completed,
                        onChanged: (_) => _bloc.toggleTodo(todo.id),
                      ),
                      title: Text(
                        todo.title,
                        style: TextStyle(
                          decoration: todo.completed
                            ? TextDecoration.lineThrough
                            : null,
                        ),
                      ),
                      trailing: IconButton(
                        icon: Icon(Icons.delete),
                        onPressed: () => _bloc.removeTodo(todo.id),
                      ),
                    );
                  },
                );
              },
            ),
          ),
        ],
      ),
    );
  }
}

class FilterButton extends StatelessWidget {
  final String title;
  final bool selected;
  final VoidCallback onPressed;

  const FilterButton({
    Key? key,
    required this.title,
    required this.selected,
    required this.onPressed,
  }) : super(key: key);

  @override
  Widget build(BuildContext context) {
    return Padding(
      padding: EdgeInsets.symmetric(horizontal: 8),
      child: TextButton(
        onPressed: onPressed,
        style: ButtonStyle(
          backgroundColor: MaterialStateProperty.all(
            selected ? Colors.blue.shade100 : Colors.transparent,
          ),
        ),
        child: Text(title),
      ),
    );
  }
}
Combining Streams for Complex State
Transforming Streams
Streams can be transformed using various operators. While Dart’s built-in functionality is more limited than RxDart, we can still implement useful transformations:
class SearchBloc {
  final _queryController = StreamController<String>.broadcast();
  final _resultsController = StreamController<List<String>>.broadcast();

  // Input
  Sink<String> get queryInput => _queryController.sink;

  // Output
  Stream<List<String>> get results => _resultsController.stream;

  SearchBloc() {
    // Transform the query stream to implement debounce
    _queryController.stream
      .transform(_debounce(Duration(milliseconds: 300)))
      .listen(_performSearch);
  }

  // Custom debounce transformer
  StreamTransformer<String, String> _debounce(Duration duration) {
    Timer? timer;
    return StreamTransformer<String, String>.fromHandlers(
      handleData: (data, sink) {
        timer?.cancel();
        timer = Timer(duration, () => sink.add(data));
      },
      handleDone: (sink) {
        timer?.cancel();
        sink.close();
      },
    );
  }

  void _performSearch(String query) async {
    // Simulate API call
    await Future.delayed(Duration(milliseconds: 200));

    final results = [
      'Result 1 for $query',
      'Result 2 for $query',
      'Result 3 for $query',
    ];

    _resultsController.add(results);
  }

  void dispose() {
    _queryController.close();
    _resultsController.close();
  }
}
Usage in a widget:
class SearchScreen extends StatefulWidget {
@override
_SearchScreenState createState() => _SearchScreenState();
}
class _SearchScreenState extends State<SearchScreen> {
final SearchBloc _bloc = SearchBloc();
@override
void dispose() {
_bloc.dispose();
super.dispose();
}
@override
Widget build(BuildContext context) {
return Scaffold(
appBar: AppBar(title: Text('Stream Search')),
body: Column(
children: [
Padding(
padding: EdgeInsets.all(16),
child: TextField(
decoration: InputDecoration(
labelText: 'Search',
prefixIcon: Icon(Icons.search),
),
onChanged: (query) => _bloc.queryInput.add(query),
),
),
Expanded(
child: StreamBuilder<List<String>>(
stream: _bloc.results,
initialData: [],
builder: (context, snapshot) {
if (snapshot.hasError) {
return Center(child: Text('Error: ${snapshot.error}'));
}
final results = snapshot.data!;
if (results.isEmpty) {
return Center(child: Text('No results'));
}
return ListView.builder(
itemCount: results.length,
itemBuilder: (context, index) {
return ListTile(
title: Text(results[index]),
);
},
);
},
),
),
],
),
);
}
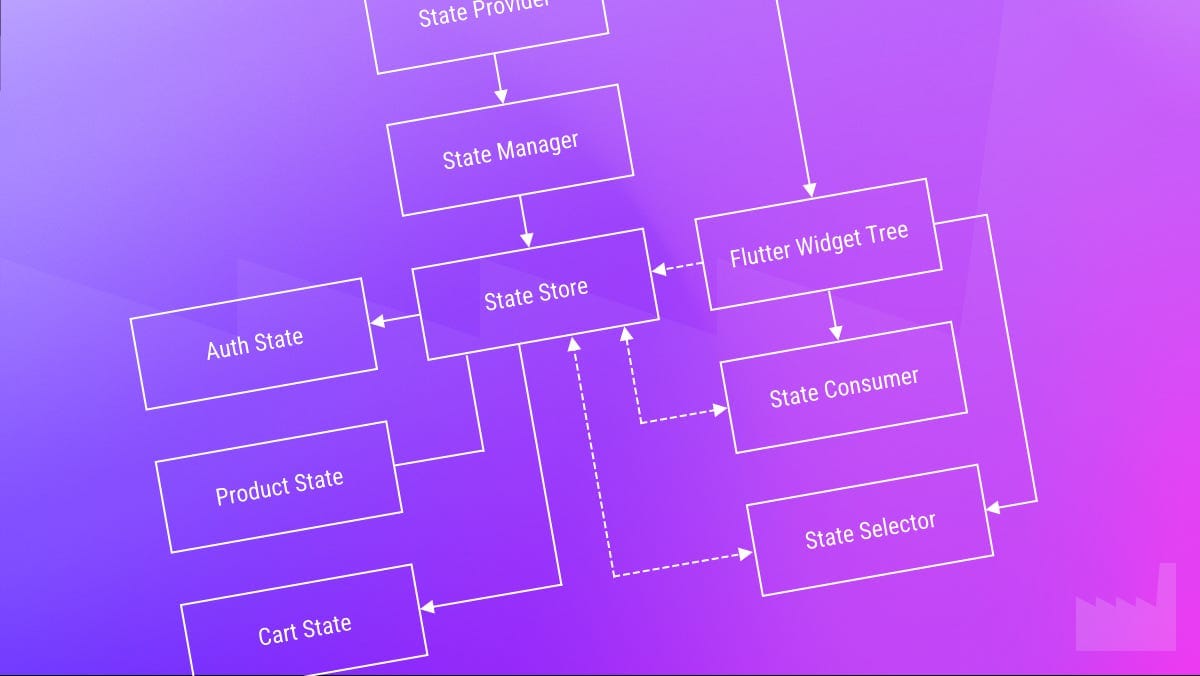
}Building Your Own State Management Solution
Now let’s combine what we’ve learned to create a lightweight, reusable state management solution that’s easy to understand and maintain.
Creating a Custom Store Class
First, let’s build a generic Store class that can manage any type of state:
class Store<T> {
  // Current state
  T _state;

  // Stream controller for state updates
  final _stateController = StreamController<T>.broadcast();

  // Constructor
  Store(this._state) {
    // Initialize the stream with current state
    _stateController.add(_state);
  }

  // State getters
  T get state => _state;
  Stream<T> get stream => _stateController.stream;

  // Update state
  void update(T newState) {
    _state = newState;
    _stateController.add(_state);
  }

  // Update state with a reducer function
  void updateWith(T Function(T currentState) reducer) {
    final newState = reducer(_state);
    update(newState);
  }

  void dispose() {
    _stateController.close();
  }
}
Let’s create a wrapper widget to provide the store to the widget tree:
class StoreProvider<T> extends StatefulWidget {
  final Store<T> store;
  final Widget child;

  const StoreProvider({
    Key? key,
    required this.store,
    required this.child,
  }) : super(key: key);

  @override
  _StoreProviderState<T> createState() => _StoreProviderState<T>();

  // Helper to retrieve the store from context
  static Store<T> of<T>(BuildContext context) {
    final provider = context.findAncestorWidgetOfExactType<StoreProvider<T>>();
    assert(provider != null, 'No StoreProvider<$T> found in context');
    return provider!.store;
  }
}

class _StoreProviderState<T> extends State<StoreProvider<T>> {
  @override
  void dispose() {
    widget.store.dispose();
    super.dispose();
  }

  @override
  Widget build(BuildContext context) {
    return widget.child;
  }
}
And a consumer widget to easily rebuild on state changes:
class StoreConsumer<T> extends StatelessWidget {
  final Widget Function(BuildContext context, T state) builder;
  final Store<T>? store;

  const StoreConsumer({
    Key? key,
    required this.builder,
    this.store,
  }) : super(key: key);

  @override
  Widget build(BuildContext context) {
    final storeToUse = store ?? StoreProvider.of<T>(context);

    return StreamBuilder<T>(
      stream: storeToUse.stream,
      initialData: storeToUse.state,
      builder: (context, snapshot) {
        return builder(context, snapshot.data!);
      },
    );
  }
}
Let’s use our custom solution with a simple counter app:
// Counter state
class CounterState {
  final int count;

  CounterState({this.count = 0});

  CounterState copyWith({int? count}) {
    return CounterState(
      count: count ?? this.count,
    );
  }
}

// Actions
void incrementCounter(Store<CounterState> store) {
  store.updateWith((state) => state.copyWith(count: state.count + 1));
}

void decrementCounter(Store<CounterState> store) {
  store.updateWith((state) => state.copyWith(count: state.count - 1));
}

void resetCounter(Store<CounterState> store) {
  store.update(CounterState());
}

// App
class MyApp extends StatelessWidget {
  @override
  Widget build(BuildContext context) {
    return MaterialApp(
      title: 'Custom Store Demo',
      home: StoreProvider<CounterState>(
        store: Store<CounterState>(CounterState()),
        child: CounterScreen(),
      ),
    );
  }
}

class CounterScreen extends StatelessWidget {
  @override
  Widget build(BuildContext context) {
    return Scaffold(
      appBar: AppBar(title: Text('Custom Store Counter')),
      body: Center(
        child: StoreConsumer<CounterState>(
          builder: (context, state) {
            return Text(
              'Count: ${state.count}',
              style: TextStyle(fontSize: 24),
            );
          },
        ),
      ),
      floatingActionButton: Column(
        mainAxisSize: MainAxisSize.min,
        children: [
          FloatingActionButton(
            heroTag: 'increment',
            child: Icon(Icons.add),
            onPressed: () => incrementCounter(
              StoreProvider.of<CounterState>(context)
            ),
          ),
          SizedBox(height: 8),
          FloatingActionButton(
            heroTag: 'decrement',
            child: Icon(Icons.remove),
            onPressed: () => decrementCounter(
              StoreProvider.of<CounterState>(context)
            ),
          ),
          SizedBox(height: 8),
          FloatingActionButton(
            heroTag: 'reset',
            child: Icon(Icons.refresh),
            onPressed: () => resetCounter(
              StoreProvider.of<CounterState>(context)
            ),
          ),
        ],
      ),
    );
  }
}
In the final section, I’ll provide a conclusion that summarizes the approaches we’ve covered and offers guidance on when to use each one.
Choosing the Right Approach
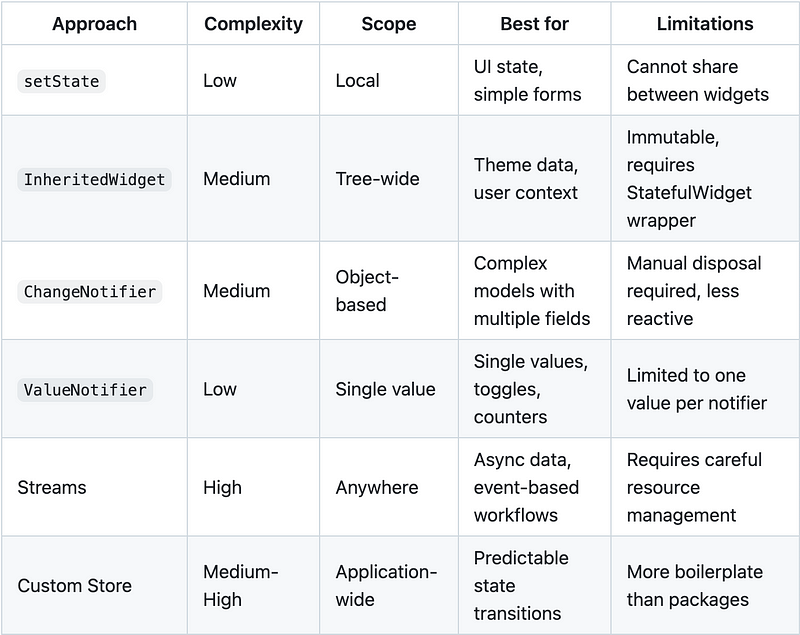
Throughout this article, we’ve explored several built-in approaches to state management in Flutter, from simple setState and ValueNotifier to more complex solutions with streams and custom stores. Each approach has its strengths and ideal use cases.
Comparison of Approaches
When to Build Custom vs. Use Existing Solutions
Build Custom When:
- Learning and Understanding: Building your own solutions deepens your understanding of Flutter’s reactivity model.
- Simple Requirements: If your app’s state management needs are minimal, custom solutions can be more lightweight.
- Specific Needs: When you have unique requirements that aren’t well-served by existing packages.
- Package Avoidance: In projects where minimizing dependencies is a priority.
- Control: When you need complete control over how state changes propagate through your app.
Use Existing Packages When:
- Team Familiarity: Your team already knows and works efficiently with a specific package.
- Time Constraints: You need to deliver quickly and don’t have time to build and test custom solutions.
- Complex State Logic: Your app has complex state interdependencies, middleware needs, or time-travel debugging requirements.
- Standardization: You want to follow widely-adopted patterns that new team members can quickly understand.
- Maintenance: You benefit from community maintenance, bug fixes, and improvements.
Best Practices for Any State Management Approach
Regardless of which approach you choose, follow these principles for maintainable state management:
- Keep state as local as possible: Don’t make everything global. Use the most local scope that works for your use case.
- Separate UI from logic: Business logic should be independent of UI concerns, making it easier to test and maintain.
- Be consistent: Choose an approach and use it consistently throughout your app. Mixing too many approaches creates confusion.
- Avoid deeply nested state: Flatter state structures are easier to update and reason about.
- Dispose properly: Always clean up resources (controllers, streams, notifiers) to prevent memory leaks.
- Test your state logic: Business logic separated from UI is easier to test.
- Document your patterns: Make sure team members understand how state flows through your application.
- Optimize rebuilds: Only rebuild the parts of the UI that depend on changed state.
Real-World Implementation Strategy
In practice, many Flutter applications benefit from a hybrid approach:
- Local UI state: Use
setStateorValueNotifierfor simple UI state like toggle buttons, form inputs, or animation controls. - Component state: Use
ChangeNotifieror custom classes withValueListenableBuilderfor state that belongs to a specific section of your app. - Application state: Use a more structured approach like your custom store, streams, or a state management package for data that needs to be accessed throughout your app.
This has been Part 2 of our “Flutter State Management: Beyond Packages” series. Don’t forget to check out Part 1 for an introduction to Flutter’s built-in state management. In Part 3 we’ll build a custom state management solution.