
Flutter State Management: Beyond Packages (Part 1)
This article series explores native approaches to state management in Flutter without relying on external dependencies.
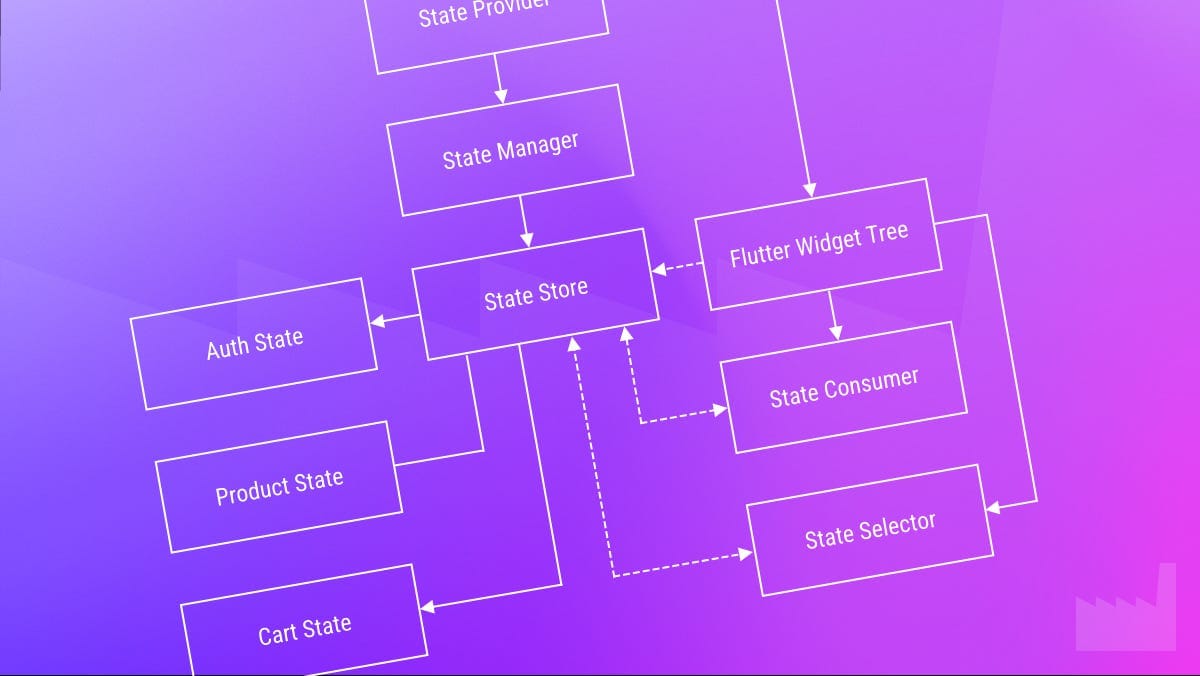
Introduction
State management in the Flutter ecosystem is often associated with popular packages like Provider, Riverpod, Get, Bloc, and Redux. While these packages offer robust solutions, they can sometimes obscure the powerful state management capabilities already built into Flutter and Dart.
This article series explores native approaches to state management in Flutter without relying on external dependencies. By understanding these foundational concepts, you’ll gain deeper insight into how Flutter manages reactivity, which will help you make more informed decisions about state management in your applications.
Later in the series we will also be covering reactive programming with streams (part 2), building a complete custom state management solution with a non-trivial practical open source example project (part 3) and then comprehensive testing of that state management solution (part 4). by the end of the series you should be very well informed about statement management, when and when not to use certain features or packages and how to build and maintain your own state management without any third party dependencies. Let’s get started!
Understanding Flutter’s Built-in State Management Tools
StatefulWidget and setState
At the core of Flutter’s state management is the StatefulWidget and its companion State class. This pairing allows widgets to rebuild in response to state changes through the setState method.
How setState Works
The setState method is surprisingly simple in principle:
void setState(VoidCallback fn) {
  // Call the function to update your state variables
  fn();

  // Mark this State object as needing to rebuild
  _markNeedsBuild();
}
When you call setState, Flutter marks the widget as “dirty,” which means it will be rebuilt during the next frame. The widget rebuilds with the updated state values, reflecting those changes in the UI.
Here’s a basic counter example:
class CounterWidget extends StatefulWidget {
  @override
  _CounterWidgetState createState() => _CounterWidgetState();
}

class _CounterWidgetState extends State<CounterWidget> {
  int _counter = 0;

  void _incrementCounter() {
    setState(() {
      _counter++;
    });
  }

  @override
  Widget build(BuildContext context) {
    return Column(
      children: [
        Text('Count: $_counter'),
        ElevatedButton(
          onPressed: _incrementCounter,
          child: Text('Increment'),
        ),
      ],
    );
  }
}
Best Practices and Limitations
While setState is powerful for local state management, it has several limitations:
- Scope: State is confined to a single widget and its descendants
- Granularity: The entire widget rebuilds, even if only a small part changed
- Depth: Passing state down through many levels causes “prop drilling”
- Complexity: Managing complex state with multiple dependencies becomes unwieldy
Use setState when:
- The state is truly local to a widget
- The state is relatively simple
- You don’t need to share state between distant widgets
InheritedWidget
When you need to share data down the widget tree efficiently, InheritedWidget comes into play. It’s the foundation upon which many state management packages are built, including Provider.
An InheritedWidget allows its descendants to access data stored within it through the BuildContext. When the InheritedWidget changes, Flutter automatically rebuilds only the widgets that depend on it.
Here’s a simple example of an InheritedWidget that shares theme data:
class AppTheme extends InheritedWidget {
  final ThemeData theme;
  final bool isDarkMode;

  const AppTheme({
    Key? key,
    required this.theme,
    required this.isDarkMode,
    required Widget child,
  }) : super(key: key, child: child);

  // This method allows descendant widgets to find and depend on this widget
  static AppTheme of(BuildContext context) {
    final AppTheme? result = context.dependOnInheritedWidgetOfExactType<AppTheme>();
    assert(result != null, 'No AppTheme found in context');
    return result!;
  }

  @override
  bool updateShouldNotify(AppTheme oldWidget) {
    // Only notify dependents if the theme or mode has changed
    return theme != oldWidget.theme || isDarkMode != oldWidget.isDarkMode;
  }
}
To use this InheritedWidget:
void main() {
  runApp(
    AppTheme(
      theme: ThemeData.light(),
      isDarkMode: false,
      child: MyApp(),
    ),
  );
}

class MyApp extends StatelessWidget {
  @override
  Widget build(BuildContext context) {
    // Access the theme from anywhere in the widget tree
    final appTheme = AppTheme.of(context);

    return MaterialApp(
      theme: appTheme.theme,
      home: HomeScreen(),
    );
  }
}

class HomeScreen extends StatelessWidget {
  @override
  Widget build(BuildContext context) {
    final appTheme = AppTheme.of(context);

    return Scaffold(
      backgroundColor: appTheme.isDarkMode ? Colors.black87 : Colors.white,
      // Rest of your UI
    );
  }
}
The limitation of a basic InheritedWidget is that it’s immutable. To make it dynamic, we need to combine it with a StatefulWidget:
class AppThemeProvider extends StatefulWidget {
  final Widget child;

  const AppThemeProvider({Key? key, required this.child}) : super(key: key);

  @override
  _AppThemeProviderState createState() => _AppThemeProviderState();

  static _AppThemeProviderState of(BuildContext context) {
    final _AppThemeProviderState? result =
        context.findAncestorStateOfType<_AppThemeProviderState>();
    assert(result != null, 'No AppThemeProvider found in context');
    return result!;
  }
}

class _AppThemeProviderState extends State<AppThemeProvider> {
  bool _isDarkMode = false;

  void toggleTheme() {
    setState(() {
      _isDarkMode = !_isDarkMode;
    });
  }

  ThemeData get theme => _isDarkMode ? ThemeData.dark() : ThemeData.light();
  bool get isDarkMode => _isDarkMode;

  @override
  Widget build(BuildContext context) {
    return AppTheme(
      theme: theme,
      isDarkMode: _isDarkMode,
      child: widget.child,
    );
  }
}
Now you can toggle the theme from anywhere:
ElevatedButton(
  onPressed: () {
    AppThemeProvider.of(context).toggleTheme();
  },
  child: Text('Toggle Theme'),
)
This pattern, combining StatefulWidget with InheritedWidget, forms the foundation of many state management solutions, providing both state persistence and efficient propagation to descendants.
In the next part, we’ll explore Flutter’s observer pattern implementations with ChangeNotifier and ValueNotifier.
Flutter’s Observer Pattern Implementations
ChangeNotifier
Flutter provides a built-in implementation of the Observer pattern through the ChangeNotifier class. This class implements a simple publish/subscribe mechanism that notifies listeners when data changes.
Creating a Model with ChangeNotifier
Let’s create a shopping cart model using ChangeNotifier:
class CartItem {
  final String id;
  final String name;
  final double price;
  int quantity;

  CartItem({
    required this.id,
    required this.name,
    required this.price,
    this.quantity = 1,
  });

  double get total => price * quantity;
}

class CartModel extends ChangeNotifier {
  final List<CartItem> _items = [];

  // Getters for immutability from outside
  List<CartItem> get items => List.unmodifiable(_items);
  int get itemCount => _items.length;
  double get totalPrice => _items.fold(0, (sum, item) => sum + item.total);

  // Methods to modify state
  void addItem(CartItem item) {
    _items.add(item);
    notifyListeners(); // This tells all listeners to rebuild
  }

  void removeItem(String id) {
    _items.removeWhere((item) => item.id == id);
    notifyListeners();
  }

  void updateQuantity(String id, int quantity) {
    final index = _items.indexWhere((item) => item.id == id);
    if (index >= 0) {
      _items[index].quantity = quantity;
      notifyListeners();
    }
  }

  void clearCart() {
    _items.clear();
    notifyListeners();
  }
}
Connecting ChangeNotifier to the UI
To use this model, we need to:
- Create an instance of the model
- Build a mechanism to listen for changes
- Connect it to our widget tree
We can use AnimatedBuilder to listen to our ChangeNotifier:
class ShoppingCartScreen extends StatefulWidget {
  @override
  _ShoppingCartScreenState createState() => _ShoppingCartScreenState();
}

class _ShoppingCartScreenState extends State<ShoppingCartScreen> {
  final CartModel _cart = CartModel();

  @override
  void dispose() {
    // Important: Dispose of the model when the widget is disposed
    _cart.dispose();
    super.dispose();
  }

  @override
  Widget build(BuildContext context) {
    return Scaffold(
      appBar: AppBar(title: Text('Shopping Cart')),
      body: AnimatedBuilder(
        animation: _cart, // The ChangeNotifier to watch
        builder: (context, child) {
          return Column(
            children: [
              Expanded(
                child: ListView.builder(
                  itemCount: _cart.itemCount,
                  itemBuilder: (context, index) {
                    final item = _cart.items[index];
                    return ListTile(
                      title: Text(item.name),
                      subtitle: Text('${item.quantity} x \$${item.price.toStringAsFixed(2)}'),
                      trailing: Text('\$${item.total.toStringAsFixed(2)}'),
                      leading: IconButton(
                        icon: Icon(Icons.delete),
                        onPressed: () => _cart.removeItem(item.id),
                      ),
                    );
                  },
                ),
              ),
              Padding(
                padding: const EdgeInsets.all(16.0),
                child: Row(
                  mainAxisAlignment: MainAxisAlignment.spaceBetween,
                  children: [
                    Text('Total: \$${_cart.totalPrice.toStringAsFixed(2)}',
                      style: TextStyle(fontSize: 20, fontWeight: FontWeight.bold),
                    ),
                    ElevatedButton(
                      onPressed: _cart.clearCart,
                      child: Text('Clear Cart'),
                    ),
                  ],
                ),
              ),
            ],
          );
        },
      ),
      floatingActionButton: FloatingActionButton(
        child: Icon(Icons.add),
        onPressed: () {
          // Add a random item
          _cart.addItem(CartItem(
            id: DateTime.now().toString(),
            name: 'Product ${_cart.itemCount + 1}',
            price: (Random().nextDouble() * 50 + 10).roundToDouble(),
          ));
        },
      ),
    );
  }
}
Building a Mini Provider with ChangeNotifier and InheritedWidget
Now, let’s combine ChangeNotifier with InheritedWidget to create a simple provider pattern:
class ModelProvider<T extends ChangeNotifier> extends StatefulWidget {
  final T model;
  final Widget child;

  const ModelProvider({
    Key? key,
    required this.model,
    required this.child,
  }) : super(key: key);

  @override
  _ModelProviderState<T> createState() => _ModelProviderState<T>();
}

class _ModelProviderState<T extends ChangeNotifier> extends State<ModelProvider<T>> {
  @override
  void dispose() {
    widget.model.dispose();
    super.dispose();
  }

  @override
  Widget build(BuildContext context) {
    return _InheritedModelProvider<T>(
      model: widget.model,
      child: widget.child,
    );
  }
}

class _InheritedModelProvider<T extends ChangeNotifier> extends InheritedWidget {
  final T model;

  const _InheritedModelProvider({
    Key? key,
    required this.model,
    required Widget child,
  }) : super(key: key, child: child);

  @override
  bool updateShouldNotify(_InheritedModelProvider<T> oldWidget) {
    return model != oldWidget.model;
  }
}

// Extension to conveniently access the model
extension ModelProviderExtension on BuildContext {
  T watch<T extends ChangeNotifier>() {
    final provider = dependOnInheritedWidgetOfExactType<_InheritedModelProvider<T>>();
    assert(provider != null, 'No ModelProvider<$T> found in context');
    return provider!.model;
  }

  T read<T extends ChangeNotifier>() {
    final provider = getInheritedWidgetOfExactType<_InheritedModelProvider<T>>();
    assert(provider != null, 'No ModelProvider<$T> found in context');
    return provider!.model;
  }
}
Using our mini provider:
void main() {
  runApp(
    ModelProvider<CartModel>(
      model: CartModel(),
      child: MyApp(),
    ),
  );
}

class CartScreen extends StatelessWidget {
  @override
  Widget build(BuildContext context) {
    final cart = context.watch<CartModel>();

    return Scaffold(
      appBar: AppBar(title: Text('Cart')),
      body: ListView.builder(
        itemCount: cart.itemCount,
        itemBuilder: (context, index) {
          final item = cart.items[index];
          return ListTile(
            title: Text(item.name),
            trailing: IconButton(
              icon: Icon(Icons.delete),
              onPressed: () => context.read<CartModel>().removeItem(item.id),
            ),
          );
        },
      ),
      floatingActionButton: FloatingActionButton(
        child: Icon(Icons.add),
        onPressed: () {
          context.read<CartModel>().addItem(CartItem(
            id: DateTime.now().toString(),
            name: 'New Item',
            price: 9.99,
          ));
        },
      ),
    );
  }
}
ValueNotifier and ValueListenableBuilder
While ChangeNotifier is great for complex state, sometimes you only need to observe a single value. Flutter provides ValueNotifier and ValueListenableBuilder for these cases.
Working with ValueNotifier
ValueNotifier is a specialized ChangeNotifier that wraps a single value:
final counter = ValueNotifier<int>(0);

// Updating the value
counter.value = counter.value + 1;  // This automatically calls notifyListeners()

// Accessing the value
print(counter.value);  // Prints the current count

// Dispose when done
counter.dispose();
Building UI with ValueListenableBuilder
Flutter’s ValueListenableBuilder makes it easy to rebuild a widget when a ValueNotifier changes:
class CounterScreen extends StatefulWidget {
  @override
  _CounterScreenState createState() => _CounterScreenState();
}

class _CounterScreenState extends State<CounterScreen> {
  final counter = ValueNotifier<int>(0);

  @override
  void dispose() {
    counter.dispose();
    super.dispose();
  }

  @override
  Widget build(BuildContext context) {
    return Scaffold(
      appBar: AppBar(title: Text('ValueNotifier Counter')),
      body: Center(
        child: ValueListenableBuilder<int>(
          valueListenable: counter,
          builder: (context, value, child) {
            // This rebuilds only when counter.value changes
            return Text(
              'Count: $value',
              style: TextStyle(fontSize: 24),
            );
          },
        ),
      ),
      floatingActionButton: FloatingActionButton(
        child: Icon(Icons.add),
        onPressed: () => counter.value++,
      ),
    );
  }
}
Creating Computed Values from ValueNotifiers
You can create derived/computed values by combining multiple ValueNotifiers:
class ShoppingViewModel {
  final ValueNotifier<List<CartItem>> items = ValueNotifier<List<CartItem>>([]);

  // Computed value for item count
  ValueNotifier<int> get itemCount {
    final result = ValueNotifier<int>(0);

    // Update result whenever items changes
    void updateCount() {
      result.value = items.value.length;
    }

    // Initial value
    updateCount();

    // Listen for changes
    items.addListener(updateCount);

    return result;
  }

  // Computed value for total price
  ValueNotifier<double> get totalPrice {
    final result = ValueNotifier<double>(0.0);

    void updateTotal() {
      result.value = items.value.fold(
        0, (sum, item) => sum + (item.price * item.quantity)
      );
    }

    updateTotal();
    items.addListener(updateTotal);

    return result;
  }

  void addItem(CartItem item) {
    final newList = List<CartItem>.from(items.value)..add(item);
    items.value = newList;
  }

  void removeItem(String id) {
    items.value = items.value.where((item) => item.id != id).toList();
  }

  void dispose() {
    items.dispose();
    // Note: We should also dispose of the computed notifiers,
    // but that requires more complex lifecycle management
  }
}
In the Next Part
This has been Part 1 of our “Flutter State Management: Beyond Packages” series. In Part 2 of this four part mini-series, we’ll explore reactive programming with streams, which provides even more powerful tools for state management.